

February is here and only one thing comes to mind...VALENTINE'S DAY!
To celebrate this time of love I am having a party and, of course, you are invited
....invited to share in the fun of creating this charming little vignette. It all takes
place on a simple 5" x 7" picture frame, which means it takes up little space but,
like so many little things, it says a lot. It is bright and cheerful and "smile making".
The centerpiece of the table was a gift to me from Charlotte Atcher of Hound Dog
Studio. I had sent her a black and white drawing and dared her to use her artistic
and laser skills to create it, never thinking she would take me seriously because I
said I wouldn't be satisfied if it didn't include the weather vane on the roof. A few
days later a little box arrived in the mail. On opening it I was stunned to see the
most perfect little Valentine house, complete with the tiniest weather vane one
could imagine...I knew immediately that this house would be the inspiration for
this project.

In a few days kits will be ready for the You're Invited to a Valentine Party
project which also can be seen at Hound Dog Studio.
project which also can be seen at Hound Dog Studio.
So, have fun and do "share the love", it is the season!
Joann
==============================================================
I will start the project with the chairs because they are the most labor intensive...
not difficult, just busy work as each is covered with red and white paper strips,
and of course there are four of them. Let's begin:

CHAIRS
Note: The instructions are for making one chair only.
You will need: 3/32” square basswood strips totaling approx.. 20” + Crafter’s
Pick or Crafter’s Pick Incredibly Tacky glue + quality, permanent glue stick such
as Avery + paper print-out of red & white striped pattern + print outs of heart
chair back on paper + white poster board + red fun foam + clear nail enamel +
a heart paper punch, ¼” at its widest + copy of seat cushion design + printer
fabric sheets in white + cotton or foam for cushion padding

Instructions:
1. Using 3/32”square basswood stripwood cut: two back legs 3” long, two front
legs 1 ⅜” long, nine pieces 1 ⅛” long for stretchers.
2. 2. Cut long rows of red & white stripes from printed sheet. Cover each side of
piece of wood with the paper strips, matching the patterns around the piece and
on like pieces (such as all legs). Use glue stick or Crafter’s Pick. Trim any
overhang off of strips.
3. 3. First assemble the chair sides as shown in diagram and when glue has set,
join them with the stretcher pieces.
4. 4. Using glue stick: Glue an uncut heart back-piece to white poster board.
When glue has set, carefully cut out the assembly. Cut out a second heart and
glue it to the back of the heart assembly.
5. 5. Punch hearts from red fun foam by first covering both sides of the foam with
scrap paper for clean edges. Glue the hearts evenly on the top of the back legs.
When the glue has set paint the hearts with clear nail enamel…this will harden
them slightly & add gloss.
6. 6. The whole chair may be left as is or painted with a gloss or semi-gloss
finish that is compatible with your printer ink.
7. 7. Print seat cushion pattern onto your printer fabric sheet following product’s
directions. Cut out adding an approx. 3/8” seam allowance all around.
Cut a 1 ¼”W x 1-3/16"D piece of poster board. Pad the top of the poster board with
a cotton (facial rounds or squares work well here) or thin sheet foam.
Cover this assembly with the printed cover by centering it on the padded top
turning the sides to the back and gluing in place, trimming corners as needed
for a neat finish. Glue cushion to seat top.
8. 8. Now the hard part….make three more.


-----------------------------------------------------------------------------------------------------------------

CHAIR PATTERN
Set printer to print at 5.92"W x 3.58"H
---------------------------------------------------

CHAIR BACK PRINTIE
Set printer to print at 5.00"W x 2.17"H
-------------------------------------------------------

CHECKED PATTERN FOR CHAIRS
Set printer to print at 3.70"W x 4.69"H
-----------------------------------------------------------------------------------

CHAIR CUSHION FABRIC DESIGN
Set printer to print at 7.14"W x 1.21"H
---------------------------------------------------------------------------------------

BALLOONS
If you would like to have balloons ties on your chairs it is best to do so before the
little heart are glued on the tops because wrapping the wire around the chair
could disturb them. I used Acrylic Gems, Made With Love, Celebrate It from
Michaels. They are bags of acrylic heart shapes in pink, lavender, and red. I
imagine they are a seasonal item so now is the time to look for them...there are
33 in a bag for under $3, so one could share.
I glued a large glass seed bead in a matching color to the point of the heart,
using cyanoacrylate glue (Crazy, Super, etc). The end of a length of #24 gauge
paddle wire was bent over on itself and squished flat with pliers until it would
fit into the hole in the seed bead. It was glued in place with Super glue.
When choosing your wire make sure it is strong enough to hold the "balloon"
upright. When the glue has set the other end of the wire was twisted around
the top of the chair and held in place with a little clamp until the Super/Crazy
glue that was applied between them was set. Straighten out the wire and
Be careful that it does not topple the chairs the balloons are heavy.

=========================================================
OK, "Sweethearts", this should keep you busy for a bit until I get more of the
project posted!
===========================================================
Here is part two of The Valentine Party, enjoy!
YOU'RE INVITED PART 2
=======================================================

=========================================================
THE PARTY TABLE
You will need: paper pattern of legs + white matboard + optional: red & white
striped patterned paper as used for chairs + a ¼” deep ring cut from a 2-15/16”
or 3” diameter mailing tube
Instructions:
1. Glue a rough cut of paper patterns on top of matboard, using glue stick
and only applying it on the non-pattern edges of the paper and to the hearts.
2. Using a sharp pointed craft knife, cut out the three leg section, following
patterns. It will take several passes around the patterns. You can also use
the point of your knife to make tiny holes around the cut-outs which if they go
all the way thru the matboard will allow you to cut from the backside too.
Remember, as always, to watch your fingers when cutting small pieces.
Cut out & remove the 4 hearts.
3. I left the matboard unpainted and trimmed the outside and curved lower
portions of the legs with thin strips of the same striped pattern given for the
chairs. You may choose to paint & antique your table legs or otherwise
decorate it.
4. Glue the two separate leg sections down the center of either side of the
larger leg piece, making sure that all is lined up, that they are at right angles
to each other and that this table base stands evenly
.
5. Measure and mark a line ¼” deep all around a the mailing tube. Use a
razor saw to cut the ring free….this piece will be the table’s frieze. Paint the
frieze to match your table legs and top.
6. Cut a round table top with a 3 ¼” diam. from matboard. Glue the frieze
centered on the underside of the table top. Let glue set. Paint the table top
to match the legs.
7. Glue the leg assembly centered on the underside of the table top.
8. Dress your table as desired…a frilly lace tablecloth (old hankie?),
crepe paper ruffles, etc. or do as I did and edge it with strips of red and
white paper cut with decorative scissors in a Victorian pattern.

Copy and paste pattern to your computer.
Set printer to print at actual size or 7.46"W x 3.90"H
Printon bright white paper
=====================================================
THE TABLE SETTING

Copy and paste image to your computer.
Set printer to print at actual size or 4.74"W x 0.75"H
Print on cardstock, matt or semi-gloss.
RISER: To show off my centerpiece I created a round riser for the center
of the table. You may use this for a little house, a cake or an
old-fashioned valentine box, etc. Print the riser piece on cardstock or
semi-gloss photo paper. Cut out with the bottom edge done with
decorative scissors. With the piece upside down, and laying on a
giving suface, roll over it with a round pencil until it curves over on itself.
Glue the side over the tab, forming a circle. A top may be added if needed.
SCISSOR PATTERN
----------------------------------------------------------------------------
PLATES: Print plates onto semi-gloss photo paper. Cut out or punch
out using a ¾” round paper punch. Lay the cutouts face up, on a slightly
giving surface such as thin Fun Foam. Using a thin plastic circle template
(an inexpensive but useful tool available where office supplies are sold)
find a circle cutout that is slightly smaller than the plate. Place it over the
plate and using a small to medium ball stylus (or dry ball point pen) “draw’
around the edges of the smaller circle to slightly indent. Remove template
and continue tracing around the indented line with little pressure until the
plate edges turn up slightly.

Copy and paste to your computer
Set printer to print at actual size of 3.58"W x 0.84"H
Print onto semi-gloss photo paper
-------------------------------------------------------------

Copy and paste to computer
Set printer to actual size or set to print at 5.33"W x 1.35"H
Print onto bright white paper
NAPKINS: Make prints onto bright white paper. Cut out the napkins
and fold into fourths for a square and then into thirds with the design
at the lower point. You may need to hold he folds with a bit of glue.
-----------------------------------------------------------------------------------------------

TREAT BOXES: Set printer to Best Photo, 6.32W x 1”H. Print out boxes
onto matte cardstock (Epson’s Presentation Paper used here). Score &
fold inward on sides and tabs. Cut ¾” lengths of white cloth covered wire
and bend to semi-circle for handles. Glue tip of wires to inside of box on
the top of the gables. Glue the separate gable pieces to the inside of the
box over the corresponding shape & over handle ends.
You may choose to decorate the treat box with glitter, cut-outs, etc. or
leave as it. Fill with candy.

Copy and paste to your computer
Set to print at actual size or 6.32"W x 1"H
Print onto lightweight cardstock
------------------------------------------------

TREAT BOX CANDY:
For Bags of Hard Candy cut a lightweight,
For Bags of Hard Candy cut a lightweight,
sandwich sized baggie in half from top to bottom and then cut widthwise
so that the bottom corner so the bag are approx.. squares. Fill the sealed
point of the squares with red no-hole beads or something similar to no
more than 3/8” deep. Tightly tie off the bag just above the “candy” with
metallic gold sewing thread with a double knot and then a bow.
Pull threads back until the bow is quite small. Put a dab of craft glue on
the knot to hold & trim back the thread ends. Cut off excess leaving
appox. 3/16” extending above bow. Place in treat box, bow side up.
For lollipops punch out small hearts; two for each lollipop in red, pink,
and white. Cut sticks from white cloth covered wire dip one end in craft
glue and place down center of heart, just short of top. Coat a second
heart with glue and place evenly over first heart, pressing firmly to enclose
wire stick. Coat heart with Diamond Glaze to add dimension and gloss.
When glaze has set poke lolli-sticks around bags of hard candy, trimming
sticks as needed.

Candy sticks are formed from Martha Stewart’s Baker’s Twine.
There are 6 spools in the pack with three different colors. With your
fingertips run a bit of craft glue along a length and twist to make a
smaller pattern. Let dry hanging straight and then cut to desired lengths.
Knit-Cro-Sheen thread (available at craft and fabric shops) in two
different colors may also be used by hold two lengths of the tread, in
two different colors side by side, running a bit of glue down the length
and twisted to desired striped pattern. Let dry hanging straight.
Whichever method, or if you choose to use Fimo canes in the same
manner, add grouped candy sticks to treat basket on opposite end
from lollies, hold with glue.


-----------------------------------------------------------------------------------------------

PARTY HATS
These are simply made from two red foil heart stickers that are approx. I”
at their widest, but of course you can cut or punch out your own hearts.
Simply place one over the other as shown and hold with glue (the “sticky”
of the stickers may eventually give away) and when the glue has set gently
curve the piece and glue the full heart (#1) over the edges of the other
heart (#2). When glue has set decorate as desired. As seen a tiny heart
sitcker was added to the front and a fringed paper was rolled into a tight
twist and inserted into the point of the hat. This is a fun little project with
so many ways to adorn the hats….you can even add string ties.

---------------------------------------------
GLASSES OF PUNCH: These are made of pieces from the children’s toy,
Lite Brite, from Hasbro. The translucent, acrylic pegs come in a variety of
color and have many uses in miniature work. Here the clear ones were cut
to class size with a small toothed razor saw. A permanent marker pen in
red was used to color about ¾’s of the outside of the peg, to make it look
like an almost full glass of red punch. Red pegs may also be used.
These pegs are offered as refills from Hasbro or doing a online search
will give you sites to buy individual colors, etc.; check our Etsy and EBay
or your local thrift store for bags of discards. Of course if there is a child
in your life you might borrow a few.


-------------------------------------------------------------------------------------
SILVERWARE: These are the salad fork and teaspoon from a Chrysnbon
set. See your local miniature dealer.

=========================================================
So there you have Part Two. Lots of fun minis to play with. Something
about working with this red, white and pink color scheme just seems to
brighten the mood. Have fun and watch for the entry, Part Three to
follow soon.
Do take a minute to leave a comment or GMail me as it lets me know you
are there and are enjoying this project.. I know from the blog stats etc. that
you are there but with a comment I can imagine I am "talking" one on one!
Don't forget to check out the project kits.
Joann
(and BTW, just come as you are for the party, I am in my PJ's)
===================================================
PART 3
RECTANGLE SIDE TABLE
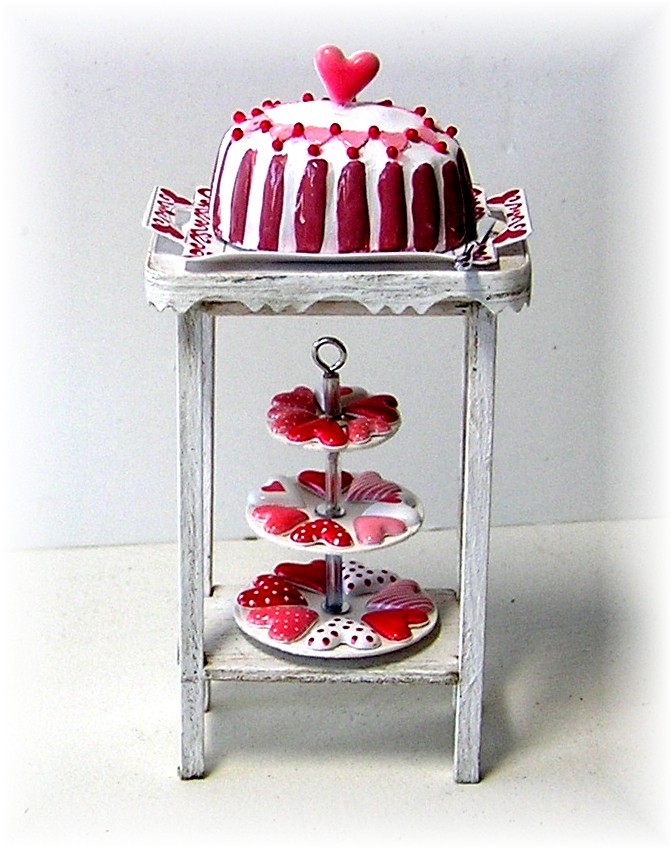
1. Cut a table top 1-1/2”x1”, and a shelf per pattern from white
matboard. From 3/32” square stripwood cut 2 two long rails and
two short rails, and four legs (LEGS may be shortened if desired) per
patterns. Corners of table top may be slightly rounded off if
desired.
2. Pre-paint before assembly.
3. Glue pieces together per diagram, with legs between rail.
Shelf may be positioned as desired keeping in mind what you will
wish to display on it; as seen it is 1.2" up from bottom of legs.
4. For added interest a skirt may be added around the top edge.
As seen it is a 1/4" deep strip of cardstock with one long edge cut
with decorative scissors, Paper Shaper #34-0008...you may use either
positive or negative cutting. Painted and antiqued to match the table the
strip was then glued in place to the table's edge, top edges flush, starting
and stopping at center back.

Copy and paste pattern to computer
Set printer to print at actual size or 3.99"w x 2.31"h
========================================================
TRAY

Copy & paste to computer
Set printer to print at actual size or 2.13"w x 1.44"h
and glossy paper heavy weight
----------------------------

TRAY BOTTOM
Copy and paste to computer
Set to print at actual size or .91"w x .70"h
-----------------------------------
Print the tray onto semi-gloss photo paper. Trace the center rectangle
or use pattern give and cut the rectangle from heavy white cardstock.
Cut out around the tray and the area between the tray and handle.
Score the center rectangle of the tray, between the tray and handle and
between the two sides of the handle and from the points of the rectangle
to the outer points of the tray.
Fold and glue each handle back to back. Note: Photo paper is
notoriously hard to glue so either lightly sand or scrap the backs of
the handles before gluing or use Cyanoacrylate (Super, Crazy, etc.)
or do both. Glue the rectangle centered over the bottom of the tray.
Let all glues set.
Gently turn up the sides of the tray, squeezing the corners as you do.
The sides should have a gently upward slope.
Slightly fold the handles upward so they are a bit above the level
of the tray.
------------------------------------------------------------------------

The cake/dessert as seen was created using a plastic mini chocolate
mold and plaster of Paris…craft stores usually carry craft-sized bags.
Online www.Amazon.com and www.candlymoldcentral.com both offer
some good choices of multi design molds for very reasonable prices.
Also check your phone book for a local cake decorating shop as they
usually have nice selections.

-----------------------------------------------------------------------------------------------
EXAMPLE OF CHOCOLATE,CANDY MOLDS
-------------------------------------------------------------------
Simply mix up a bit of plaster, following bag directions, pour into mold
and let set for a bit and push out of mold. If you have problems with the
plaster sticking, dust the mold lightly with talc or cornstarch before
adding the plaster. Let the piece dry, preferably overnight and
paint/decorate as desired. It doesn’t take long to whip up a dozen or
more shapes making this a fun club/group project. It is fun to see the
different variations that will emerge from just one shape.
------------------------------------------------------------------------------------------
-----------------------------------------------------------------------------------------------

TIERED CAKE PLATE
You will need 6 rounds, three for the top and three for the underside.
-Tops: 7/8” diam. and ¾” diam. and 5/8” diam. cut or punched from
semi-gloss photo paper
-Undersides” ¾” diam. to go under the 7/8” diam. top; 5/8” diam. to
go under the ¾” diam. top; 3/8” diam. to go under the 5/8” top…all
from shiny white scrapbook paper.
There are paper punches available for all of these sizes.
-Glue the bottoms evenly under the tops.
-Poke clean holes thru the center of each of the three plates large
enough to take the eye pin. You may slightly shape the plate as was
described for the dessert plates.
-Lay five regular size silver sequins, one at a time, on a piece of paper.
Center a 1/8” round paper punch over it and punch. The paper will help
stabilize the sequin while being punched. You also need an approx. 7/16”
silver sequin.
-You need three silver or clear bugle beads, two approx.. 7/16” long and
one approx. ¼” long
-Start by inserting the short bugle bead on the eyepin, pushing it all the
way up to the eye.
-Insert a punched sequin center; add a bit of glue on its underside and
-insert the smallest plate, snugging it up to the sequin.
-Insert another punched sequin with a bit of glue.
-Follow the same procedure using the two larger bugle beads.
-End with the large sequin glued to the underside of the large plate,
concave side down.
-When the glue has set nip off the excess eyepin with wire
The cookies are dimensional stickers which come with various
sizes on a sheet.

Copy and paste pattern to computer
Set printer to print at actual size or 4.95"w x 3.0"h
-------------------------------------------------------------------------------------------
CANDLE-STYLE SIDE TABLE

1. Cut a round 1-3/8” diam. table top and a from white matboard.
Cut a ½” square leg brace from matboard or 1/16” sheet basswood
or use a ½” square Woodsie.
2. For the spindle I used 2-1/2” long a one-of turning from my stash.
Just about any table leg/baluster with a squared end will work. If you
would like a shorter table simple cut off some of the length form the squared
end.

3. Drill or cut a hole in the center of the brace the diam. of the rounded end
of the leg of your choice. Glue the brace, centered, on the bottom of the
table top.
4. For the feet I used the ends of flat wooden sandwich picks. (A box of
750 costs under $3; they have lots of uses mini-wise, esp. as glue
applicators). You may choose to shape your own feet using 1/8” thick
stripwood. To prepare the picks I glued two sandwiched (no pun intended)
together, a total of four. When the glue sets sand them smooth and then cut
them to ½” lengths from the fatter end.

5. Paint all table pieces white or color of your choice) and when paint has
set antique as desired.
6. Glue the smaller ends of the feet, one each centered on a side of the
squared end of the spindle. Let glue set, making sure that all feet are sitting
flat.
7. Glue rounded end of spindle into the hole in the brace in the underside
of the table top
.
8. Table may be left as is or a skirt of scissor cut trim may be glued around
the table top edge as described above for the square table
.
9. I added a paper valentine themed cutout to the top of the table.

Copy and paste doily to your computer
Set printer to print at actual size or 1.37"w x 1.37"h
Print onto bright white paper at best printer setting
=====================================================
=====================================================
The punch bowl is a ooak from my collection. The ladle is Chrysnbon.

-------------------------------------------------------------------------------------------
THE BASE
The base is a white 5” x 7” inexpensive, purchased picture frame.
Everything was removed from it. Pieces of matboard or heavier board
were cut to fit to bring the level up almost to the top of the back of the frame.
The back of the frame will be used for the vignette because it is larger.
Glue the board in place. Cut a piece of flooring of your choice to fit the
opening. As see a simple piece of slightly mottled red scrap book paper
was used. It is glued down with glue stick.
For interest and aesthetics, four large, flat backed, wooden beads were
painted to match the frame and then were glued to the underside of each
corner of the frame.

--------------------------------------------------------------------------------
So the party is complete ...except for the guests. Hope you had a good time,
I sure did.
If creativity strikes in the next few days I may design a little Valentine
Glitter-type house for you.

Happy Valentine's Day!!!