

------------------------------------------------
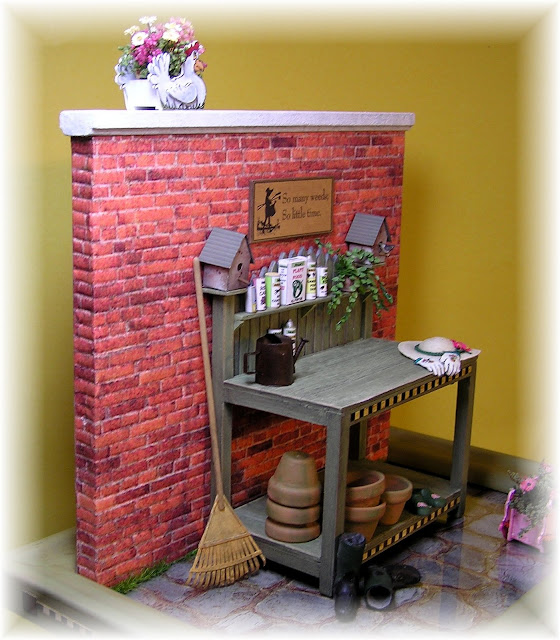
JULY 3RD: THE COMPLETED PROJECT
JULY 3RD: THE COMPLETED PROJECT

Well the weather here in the Pacific Northwest is still either overcast or rainy, with just a couple of days at 70 degrees since last October…where has the sun gone? This is not inviting weather for gardening…in real life that is, so to the Miniature Garden I go.
Every gardener needs a place to work & store and a Potting Bench is a perfect solution. I think you will enjoy making this one because it is relatively simple, needing just a few supplies and only hand tools. There is also enough lead way for you to add your own touches to make it your own, if desired.
I will be adding projects to fill on and around the Potting Bench over the next few weeks so be sure to scroll down each time you return to this blog.
And if you have any extra sunshine where you live please send some this way…we need it,
Joann
--------------
To Date: Parts #1 through #9
-------------------------------------------------
THE POTTING BENCH : Part 1
You will need: ¼” square stripwood + 3/32” (.080) book board or sheet wood + pointed or very small ball stylus + medium tooth razor saw + ¼” x 1/16” stripwood (if you have a Lowes near you check it out for poplar stripwood) + 1/16” square stripwood + 1/16” thick sheet wood (Woodsies Skinny Craft Sticks used here)

Click on image to enlarge. Copy and paste to computer
Print at actual/exact size or 8.35"W x 10.78"H
-------------------------
Instructions:
From ¼” square stripwood cut, two front legs 3” long (A’s), two back legs 4 ½” long (B’s), four side braces 2” long (C’s), two front and two back stretchers 4” long (D’s), two center braces 2” long (E’s).
Measure and mark a line ¼” up from bottom of A & B pieces. Glue C pieces between A&B pieces to join them, making two bench sides as shown.
Join the two side assemblies with the D pieces using pattern as guide.
Glue the E pieces between the D pieces, centered side to side. You now have the framework of the potting bench. Finish as desired…see end of instructions for ideas.


Cut a bench top and a bottom shelf from3/32” thick book board or sheet wood. The top is 4 ½” x 2 ¼” (if using wood the grain will run with the length of the piece). The shelf is 4 ½” x 2 ½” (if using wood the gain will run with the width of the piece). Working on the top piece, divide it into three. ¾” wide sections with a pointed or very small ball stylus, to indent the lines. Continue the lines over the edges. Scrape a razor saw over the top surface of the top piece to create a wood grain. Paint to match bench frame. Glue evenly to top of frame.

Click on image to enlarge. Copy and paste to computer.
Set to print at actual/exact size or 6.89"W x 9.36"H
----------------------------
Working on the bottom shelf, cut ¼” squares from each corner. Measure and mark to divide the shelf into ½” section, using a pointed or very small round stylus to indent on lines. Use razor saw to scrape across shelf in direction of arrow to create a wood grain. Paint to match bench frame and glue evenly to frame.
Cut a 4” length of 1/16” square stripwood. Paint to match bench and glue just in back of the bench top.

Using the ¼” X 1/16” stripwood, cut 14 pickets sized and shaped as shown. Paint to match bench. From the same stripwood cut to rails 4” long and finish matching pickets. Glue the shortest pickets to one of the rails, bottom and side edges flush. Glue the center picket to the center of the rail, bottom edges flush. Glue the remainder of the pickets to the rail, spaced fairly evenly apart(no need to measure, just eye-ball). Glue the 2nd rail across the pickets, ¾” up from the bottom rail. When the glue has set, glue the picket assembly to the inside face of the top/back D stretcher, the extending sections of B’s, and to the 1/16” square piece.
Cut two 9/16” sq. (or at least the same size as the base of the birdhouse that will sit here) pieces of 1/16” sheet wood (or matboard). Paint to match bench and glue, centered on top of extending posts.


Potting Bench Birdhouse Toppers:
Copy birdhouse printie onto matte presentation paper. Cut out. Center a 1/8” round paper punch over the large white circle and punch for opening. Using watercolor pencils color the inside of the what will be the back wall of the house to somewhat match the outside of the house…this is just so the white will not show thru the punched hole. Score and fold on all lines. Glue house together, tabs to inside. Fold roof in half. You may either color the inside of the roof or glue to roof printies together so color in on both sides. Glue roof to top tabs of house. Tint all exposed cut edges with watercolor pencils. Poke a hole thu the smaller marked dot and insert a small section of a round toothpick for a perch. Glue birdhouses to top of platforms on posts.

Click on image to enlarge. copy and paste to computer.
Set to print at actual/exact size or 6.18"W x4.02"H
Print on Matte Presentation Paper using best settings
--------------------------------
Painting the Potting Bench: As seen, the whole bench was painted with a celery-green color acrylic. When the paint dried it was weathered with a 1/3 black acrylic to 2/3 gel stain medium (Delta used here). Excess aging medium was removed with a damp cloth. The finish was lightly sanded back in areas that would naturally be more worn/aged.

For a rougher finish all or part (pickets?) can be aged/weathered with a crackle finish. To achieve this look start with an base coat of medium gray acrylic. When dry add a coat of a crackle finish medium (look in the craft paint section for several brands to choose from) and carful follow the directions for application. Or paint over the base coat with a fairly thick coat of Elmer’s glue; let dry just until it is still a bit tacky and then paint over it with your color choice in one stroke. As the glue continues to dry the top coat will open in cracks. I suggest you practice either crackle technique on a scrap piece or two before applying to your potting bench. Personally, I keep my practice samples of all painting techniques with notes to myself on what to and not to do for future reference.
Trim: A decorative trim may be added to the potting bench. This can be done by hand- painting, stenciling, rubber stamping, applying stickers or printies…wherever your talents lie.

Click on image to enlarge. Copy and paste to computer.
Set to print at exact/actual size or 4.63"W x 1.87"H
Print at bet setting onto bright white paper
=================================
PART TWO
"Another rainy day here...not drizzling but pouring...but the Wisteria on the boathouse seems to love it and it smells wonderful, so not to complain (too much)"

------------


Shallow Shelf
The same stripwood that was used for the pickets (1/4” x 1/16”) was used to cut a narrow shelf to fit across the pickets from inside the posts. Shelf brackets are three triangles cut from the same stripwood…simply use the 45 degree angle slot in a mini mater box to make a cut from the very end of the wood., turn the wood over and cut another bracket and repeat for the third one. Paint all pieces to match the bench. Glue brackets to bottom of shelf piece, one on each end and one in the center, making sure they are squared-up. When glue has set adhere shelf to face of pickets, placed as desired, keeping in mind what will be placed on or under the shelf.
Small Gardening Products
Make lightweight paper copies of products. Cut out. For cans, start at plain end of the strip & roll up tightly. When you come to the end and still holding the roll tightly decide on how fat you want the particular can…if larger release the roll a bit, if smaller undo some of the roll. Cut off any excess strip so the seam sits on the other side of the roll from the printing.

Click on image to enlarge. Copy and paste to computer.
Set to print at actual/exact size or 7.59"W x 5.22"H
Use best settings and print onto bright white paper.
-----------------------------------
You may choose to finish in several ways:
(1) For a spray can, gently push up the coil from bottom with a pencil point or similar tool until it “peaks” out the top. Paint the peak with a light coat of glue to hold the shape. When glue has set, paint the peak metallic silver. Cut a snippet from a paper clip or heavy wire (wear eye protection as pieces can fly) and glue into center of top coil for a nozzle. Punch a round of silver metallic cardstock or tooling metal and glue to bottom of can.
(2) Punch rounds from matboard and glue a single round or stacked rounds (depending on height wanted) to top of can for a lid. Add a punched cardstock round to the bottom.
(3) Punch rounds from silver metallic cardstock or tooling metal and glue, one each, to top and bottom of can. Sprinkle holes may be dotted on with black acrylic using a pointed toothpick.

Click on image to enlarge. Copy and paste to computer.
Print a exact/actual size or 2.24"W x 3.27"H
Use best settings and print onto matte presentation paper.
------------------
For the box, cut out, score and fold on lines. Glue side over tab & tops and bottoms over tabs and each other. For interest the lid flap may be left open.
-----------------------------------------
TRAILING PLANT

You will need a tiny container that will fit on the narrow shelf. If you don’t have one in your collection look at various lids to tubes from your medicine chest or craft supplies. These oft times work well if painted to look like pottery. Fill the container with a bit of Styrofoam held with glue. Paint the top of the Styrofoam with brown acrylic.

The leaves are tiny hearts punched from solid core, leaf green, lightweight paper. The punch used is Fiskar’s 3-in-one heart corner punch…I like using this punch because you get multiple heats with one punch and it has a nice variety of sizes. Lay a bundle of punched hearts on a piece of white Fun Foam. Use a pointed stylus to “draw” a line across the heart from the point. This will give shape to the leaves.

Cut a length, longer than needed, of green buttonhole thread for the vine. Make a small puddle of Crafter’s Pick Incredibly Tacky glue n your work surface. Using pointed tweezers pick up a leaf by the pointed end; dip the other end in a bit of glue and place on end of thread. Continue adding leaves, staggering as you move down the thread/vine. Start with smaller hearts and end with larger ones. When glue on the vines has set, pick them up and using a fine-feathered, flat paintbrush pick up a bit of a green acrylic craft paint in a shade several times lighter than the leaf paper; Add the paint to the leaves starting at the edges and feathering inward. The paint color should not draw your eye to it but rather add interest and depth to the leaves.

Decide how long you want your tailing vines to be and cut off excess thread, leaving enough to poke into the container. Poke a hole in the Styrofoam and insert the end of the thread into it with a bit of glue. Drape the vine as desired and continue adding vines until you are happy with the plant. The larger leaves at the end of the vine should fill the container nicely but separate larger leaves can be added here and there to the potted plant as desired. Using thread for the vine gives a natural flow to them and makes them easy to arrange. A dab of glue may be used here and there to hold them in place.
-------------------------------------
Hopefully there will be some sun this weekend so I can at
at least pull a few weeds without wearing rain gear. In the mean
time this mini-gardening is rally more my style,
,
Joann
------------------------------------------------------------------------------
Project Segment #3 Garden Hat, Gloves & Clogs
GARDEN HAT

The woven-looking hats can be decorated to your heart’s content and the technique learned here can be used to create many other faux-woven items.
First, you will want to decide on what size and shape you want your garden hat to be. It can be a smaller brimmed, more practical style or a floppy-brimmed version decked out with flowers and ribbons. Decide how high and wide the crown and how wide the brim.
Next, look around you for a form that is approx. the width of the crown. This can be a rounded tool handle, a dowel or what have you. It can have either a flat top or a rounded top. On the form mark a line around it that is the depth of the crown.

Cut an approx. 2” square piece of matboard. In the center of this piece draw a circle that is the same diam. or just a smidge larger than the diam. of the form. Cut out the circle. On the matboard square draw another circle, centered over the first, that is the diam. of the desired brim.

Cover the matboard with plastic wrap holding it tight with tape on the bottom. Cut out & remove the wrap over the center hole. Cover the form you are using for the crown with plastic wrap and hold with a rubber band below the marked line. Insert the covered form into the hole in the matboard so that the marked line on the form is even with the top of the
mat-board

The hat will be made of heavy cotton thread/string such as Knit-Cro-Sheen in color of your choice. The thread may be used as is or it may be crocheted into a chain stitch or braided for a fancier woven look.
This project is a bit messy and sticky so have a damp cloth handy near your work to constantly clean your fingers. Pour a puddle of Elmer’s white glue. With either your fingers or a paint brush coat a section of your chosen thread with the glue. On your finger form a small, tight coil with the wet thread and place it, centered, on top of your crown form. If possible you may hold the coil to the form with a push pin. Continue adding glue to the thread and continue with the coil until you have reached the depth of your crown or the matboard. Make sure your thread is continually saturated with the glue…don't worry about using too much hlue (unlike most miniature projects), and you may add another coat of glue over the coil with a paint brush. Let the glue set for a while until the coil is stable and then continue the coil onto the mat-board until your marked brim diam. is reached. Cut off thread at an angle and meld the cut end into the coil it is next too. Paint on a coat of glue. Let glue dry, preferably overnight. The drying process can be hurried a bit with a heat gun on its lowest temp.

When the glue is not sticky to the touch, cut the rubber band from the form and gently pull the form from the crown. Very gently pull the plastic wrap from inside the crown.
Cut the plastic wrap free from the matboard and then gently pull it away from the brim. Paint on a thin layer of glue to the underside of the hat and to any parts of the coil that may not have held. Let hat dry thoroughly.
If you are not pleased with the color of your hat you may paint it with acrylics.
Add a ribbon or thread, plain or braided, around the base of the crown, ending with or without a bow or trailing ends. Add string ties to the hat by either gluing them or sewing them on….these are on the underside, and can be used to display the hat hanging.
Add whatever trims "sing to you"…flowers, bows, butterflies, birds…but do keep in mind that this should be somewhat of a “working” hat.

GARDEN GLOVES
Make printies of gloves onto bright white paper or 200 thread count printer fabric. Carefully cut out matching pairs of fronts and backs. Run a thin line of glue around the very back edges of the glove front except for the openings. Glue a back to it, matching them up as close as possible. Trim any overlaps as needed. Repeat for 2nd glove. When glue has set, use a round toothpick or pointed stylus to open up the gloves. Lightly stuff with bits of cotton for a fuller, used look. Bend and crease here and there to pose for a natural look. Cuffs may be colored, as shown, if desired.

Click on image to enlarge. Copy and paste to computer.
Set to print at actual/exact size or 6.30"W x 2.19"H
Use best printer settings & print onto bright white paper
or 200 thread count printer fabric
-------------------

GARDEN CLOGS
The clogs are made from Plaster of Paris. You may use either a figural push mold from Sculpey or , as I did, baby booties from a candy mold from Amazon.com. Follow the directions on the Plaster of Paris box for working with molds. If using the figural mold, pour the feet only. Using the candy mold find the booties I have marked and cut them free from the mold leaving a ½” border around a pair. Paint the inside of the mold lightly with liquid detergent as a release agent.


Stir the plaster and water slowly to prevent bubbles but if they form blow on them to remove. Fill the molds just a bit over the top and when the plaster has set a bit use something rigid, like a credit card, to scrape across top of mold to removed excess plaster. When the plaster has cured (it doesn’t take long) remove forms out of mold. When the plaster has dried completely use knifes, files, sandpaper, fine tips on a Dremel Tool, and what have you to shape into backless clogs (if using the feet mold, start by sanding away the toes; if using the booties mold start by separating the pair with a razor saw). Carve/ream out the inside of the clogs. Of course make a matching pair. You will find the plaster to be quite strong but for extra strength you can use Hydro-Cal instead.
Paint the clogs with acrylics, green or whatever color pleases you. Add nail- art decal stickers in floral designs for fun & interest...these are so darling and come in a wide variety tiny designs that are great for many mini uses.

A big thank you to all who sent some sunshine my way...we had three full days, enough to fortify me for the rain that is predicted for this week. Well, rainy days are a good excuse to spend more time in my studio so I won't complain. See you soon with more projects for your Potting Bench...
Joann
==========================================
Potting Bench Part 4: CHICKEN PLANTERS
WHITE CHICKEN PLANTER
Print out copies of planter on bright white paper. Cut out four images. Using quality glue stick, adhere one cutout to approx..1/32” thick, white paper board. When glue has set cut out board around image. Glue a 2nd cutout to the 2nd other side of this piece, lining it up as close as possible & trimming as needed. Repeat procedure for a second side. Cut out the wings from the last two images. Glue them onto the same board. Cut out and glue over wings on prepared sides.
Cut out box sides, bottom and ends from 1/16” white matboard or 1/16” thick wood. Glue bottom to sides, set up 1/16” up from bottom edge of sides, as shown. Glue ends between sides and to bottom. If needed paint box white. When glue and paint have set glue box between prepared chicken sides, bottom edges even.


Click on image to enlarge. Copy and paste to computer.
Print onto matte presentation paper with printer set at actual/exact size or 3.76"W x 4.71"H
Use best printer settings.
--------------------

Click on pattern to enlarge. Copy and paste to computer.
Set to print at actual/exact size or 3.95"W x 2.81"H
--------------------
-------------------------------
RED CHICKEN PLANTER
Follow directions above for the White Chicken Planter using the separate wing section for the cut-out applique.

-----------------------

Click on image to enlarge. Copy and paste to computer.
Set to print at actual/exact size or 7.71"W x 1.71"H
Print on matte presentation paper at best settings.
----------------------

Click on pattern to enlarge. Copy and paste to computer.
Set to print at 3.47"W x 1.49"H
------------------
FILLING THE PLANTERS

For these planters I have taken a simple approach. First a square of Styrofoam was cut to fit into the box and glued in place. The top was painted with brown acrylic.
Snippets of assorted green dried foliage were poked into the Styrofoam. Next clusters tiny of dried flowers were added. All of this was topped by assorted colors of simple paper daisies.
To create the daisies:
Cut lengths of fine (#22 or #24) green cloth covered floral wire. Dip a wire tip into thick craft glue and then into yellow, Woodland Scenics Flower/Turf Material. (This soft, shredded material comes in a four pack, yellow, red, pink, white. It is a model railroad product that has many uses miniature-wise. It is available at model railroad shops and thru Walthers online http://www.walthers.com/exec/productinfo/785-48 ). Use your fingertips to shape the material into a flat round approx.. 3/32” across. Poke wire into a scrap of Styrofoam to let glue set. Make as many of these flower centers as desired.

Use a 3/16” or ¼” round paper punch to punch out rounds from your choice of lightweight paper. With a pointed stylus poke a hole in the center of the rounds. Insert two rounds onto a prepared wire and push it up to meet the yellow center. Using small sharp scissors (I recommend Gingher Large-Handle Embroidery Scissors (G-40144 for their superior quality and comfort. They are very kind to arthritic fingers) finely fringe around the paper rounds for petals. Use a pointed stylus or such to fray-out the petals. Punch out a 1/16” round from green paper. Poke a hole in the center and insert onto the wire with a bit of glue on top. Push it up tightly to the underside of the petals.
If you would like to add leaves to the stems, cut very fine pointed slivers of green paper. Glue these, staggered, down the stem so one end is pointing slightly out. Three or four to a stem is good.
I am now working on putting the Potting Bench in place on a base so its accessories can start to be arranged thereon. I have a large list of items to pick and choose from to add to this vignette for your DIY pleasure, but if you would like to suggest something that would be of special interest to you, do so, and I may add it to the list.
Here’s hoping you are finding time for some miniature gardening along with the real-life version. Personally, I need to get some more container veggies in…oh, and the cats reminded me not to forget the catnip…their favorite crop.
See you soon,
Joann
========================================================


Joann
DRYING RACK


Make a thin wash of water color paint & water. Use a small brush to apply one or more colors to the Hydrangea. The amount of color is up to you as is the color itself. I suggest you look online or in books at the variety of colors Hydrangea blooms come in. For your drying rack you probably will want to make several color tones.

Joann


 Add a decorative accent to the top of the rack if desired. As seen here a metal button in the form of a sun face was used.


Using either of the two designs shown on the Fiskars Leaves Corner punch ( Fiskars 12-23307097 3-in-1 Corner/Border Punch, Leaves ) , punch them out from medium-green, light weight paper. Lay the leaves on a piece of thin white Fun Foam and using a needle tool or pointed stylus, “draw” a line down the center of each. And then “draw” a few vein lines on each side. This procedure will cause the leaves to slightly crinkle up. Three or so leaves may be added to flower or bud stems stem or flower and buds may be placed in Pansy Box or pots and leaves added to fill in around flowers as desired.

Potting Bench Part 5: THE BASE
Brick wall, Stone Floor, Grass, Sign

The Potting Bench sits on a 6 ½” x 8 ½” purchased picture frame. Everything was removed from the frame & it was painted in the same green and weathered to match the potting bench. A similar checked design to the one on the front of the bench was used on the front and two sides of the frame.
For the “flooring” I used a piece of out-of-print, stone patterned scrapbooking paper, Rock Pathway by Jill Webster from Provo Craft. You may be able to find something similar. If not you may choose what I often do: Purchase a full-size, thin, self-stick, textured vinyl floor tile in a pattern and color of stone flooring desired….these are inexpensive and offer many to choose from. Cut the tile to fit your base. Draw irregular shaped stones on the face of the tile. Using a Dremel tool fitted with an appropriate tip, such as a #516 Abrasive Point, ream out around the drawn tiles for motor lines. This is a fun and easy job, best done outside and for sure with a dust mask & safety glasses on.

ROCK PATHWAY PAPER BY JILL WEBSTER
-------------------------
If you are using paper flooring: Glue-stick it to a piece of matboard and when the glue has set use a large ball stylus to indent around the stones on the grout lines. You may choose as I did to use the frame’s glass on top of the flooring for protection (especially if you wish to glue or sticky-wax down pieces on what may be a temporary basis). Fill in the frame with scrap matboard or whatever is needed to make it flush with the back of the frame. Cut a piece of paper, plain or decorative, to fit over the whole back of the frame, gluing it smoothly down to the frame itself to hold things in place and for a finished look. If you are using the tile flooring you can eliminate the glass and fill in the rest of the space as described.

I decided a brick wall would make a nice backing for the bench but there are certainly other ideas that would work such as a trellis, fence, and hedge. For the brick wall I cut a piece of ½” thick foam core board 7” high by the width of my frame opening. A brick patterned printe was used to cover the piece foam core. If you are using the one I have given you print out two sheets. Use a glue stick for adhering….Hint: the secret to success with glue stick is to always use a permanent, acid free brand & apply the glue on both surfaces, such as here, the paper and the foam core. First cover the front by lining up bottom edges of paper and foam core with equal amount of paper extending from each side. Clip the top corners and glue the paper over the ends and top and then to the back of the foam core, without any overlapping. When the glue has set a bit, lightly sand the back edges of the paper so they will not show when covered. Cover the back of the wall with the same paper, all edges flush. Use flat of fingernail to meld the cut edges of the paper to the wall.
Using a medium ball stylus and a straight edge, slightly indent the mortar lines between the bricks to add depth.
Using a medium ball stylus and a straight edge, slightly indent the mortar lines between the bricks to add depth.

You can also choose to have a plastered-over brick wall. To do this the most important step is to prevent your brick printie from bleeding. So spray both sides of the paper with a couple of couple of coats of clear matte fixative, drying well between and after coats. Apply a heavy coat of Gesso with a flat paintbrush leaving areas of brick showing thru. The Gesso does not have to be smooth. A 2nd coat may be applied if desired/needed. When the Gesso has dried completely sand it as smooth as desired especially around the exposed brick areas. The Gesso may be antiqued/weathered with a light mixture of raw sienna acrylic and Delta Gel Stain Medium. A darker mixture of burnt umber acrylic and gel stain medium may be used to lightly highlight the exposed brick edges and create cracks radiating here and there from them. If you decide to use the plastering technique I strongly suggest you practice a bit on scraps of your brick paper especially to make sure the printer ink does not bleed thru the fixative and tint your plaster.

A piece of full sized wood molding was used to top the wall but paper board can also be used. I mixed fine black sand into white acrylic paint to cover the molding. When the paint was dry I lightly washed it with a very watered down gray acrylic, sponging off the excess. The finished wall was glued in place to the glass on the frame, back edges flush.

Click on image to enlarge. Copy and paste to computer.
Set to print at exact/actual size or 8.29"W x 10.43"H
Print onto bright white paper at best settings
------------------
For an added bit of interest and because the birdhouses on the potting bench mean that the bench does not fit flush to the back of the frame, I added some grass in front of the wall. The grass is a terry cloth towel painted in several colors of grass greens and when dry cut into strips. Look for a fine terry cloth and if you start with a green it is easy to cover. Of course you can purchase terry cloth at fabric stores but 2nd hand shops are great sources for soft green towels to convert to grass. I think I will be adding a dandelion or two in the grass…got to have at least one weed.

After I decided how I wanted my potting bench to be situated I add a garden sign to the wall. Print the sign onto a medium brown or if you can find it a wood-patterned piece of scrapbooking paper. Gluestick it onto a piece of paper or wood board cut to size. Color the edges with water color pencils to match the print.


Click on image to enlarge. Copy and Paste to computer.
Set to print at exact/actual size or 6.48"W x 3.00:H
Print onto wood grain pattern scrapbook paper
using best settings
------------------------
That is it for the day & I will see you in a day or two with more projects to fill this vignette. Do let me know if you are enjoying the Potting Bench project; I like to know that "you" are out there...I see your great numbers but it is inspiring to add your "voice". It also lets me know I am hitting the mark.
Joann
===============================================
Potting Bench Part 6: Drying Rack + Hydrangeas

The perfect piece on which to hang your herbs and flowers to dry. Or finish the wood a bit more “dressy” and bring it inside to display your lacy needlework. Of course it could also be used in a laundry room. The size of the rack is easily changed, both height and width-wise. It also can have more than two sections. This one is proportioned to fit nicely in a corner of this
Potting Bench vignette.
You will need: 3/32” square stripwood + 1/16” dowel + wood glue + black wash + fine wire + rust colored acrylic paint + Dremel Moto tool with a 1/16” drill bit or a pin vise fitted with the same.
Instructions:
Cut four lengths of 3/32” square stripwood, each 4” long for the legs. Lay them evenly side by side and mark the positions of the cross bars, as show in the pattern. Drill 1/16” holes thru the legs, centered side to side. Slightly round off each end of the legs.
Cut six cross pieces from 1/16” dowel, each 1-7/8” long. Glue the cross pieces into the legs to join them, constructing two ladder like pieces. The ends of the cross pieces will be flush with the outside of the legs. Wood glue is used here.
When glue has set paint the two pieces with a light wash of back acrylic and water to age/weather.
Join the two pieces by holding them at right angles to each other and wrapping wire around them to hinge. Color the wire hinges with rust colored acrylic to weather.
Use sewing thread to tie your flowers and/or herbs to the rack to dry. Herbs can be simulated by bunches of dried flowers in assorted colors.

Click on image to enlarge. Copy and paste to computer.
Print at actual/exact size or set to print at 3.72"W x 5.20"H
------------------
HYDRANGEAS

You will need: medium to light green floral tape + lightweight paper in light cream tones + ¼” diam. floral paper punch + a medium ball & a pointed stylus + scrap of fun foam & Styrofoam + green floral wire + Crafter’s Pick Ultimate glue + water colors + 3/8” long leaf paper punch (birch works) + lightweight, medium green paper
Instructions: For the center of the bloom, stretch a length of floral tape and cut a piece 10” long. Roll and squeeze into a ball that has an approx. 1.4” diam. Slightly flatten the bottom. Poke a hole in the center of the slightly flattened side. For stem, cut an approx. 1½” length of floral wire. Wrap it in floral tape, stretching the tape as you twist it around the wire. Add a dab of glue to one end of the stem and poke it snuggly in the poked hole in the flower center. Poke into a scrap of Styrofoam to dry.

Punch out 15 or so flowers using the paper punch & lightweight paper. Lay the flowers on a piece of fun foam and using a medium ball stylus trace around the flower in a circular motion, causing it to cup up a bit and then use the stylus to push down on the center of the flower causing it to completely cup up.

Using pointed tweezers, pick up a prepared flower by an edge, dip the very bottom in a bit of glue and place it on the center top of the prepared flower center. Continue in this method until the whole center is covered. Poke into Styrofoam until the glue has set.
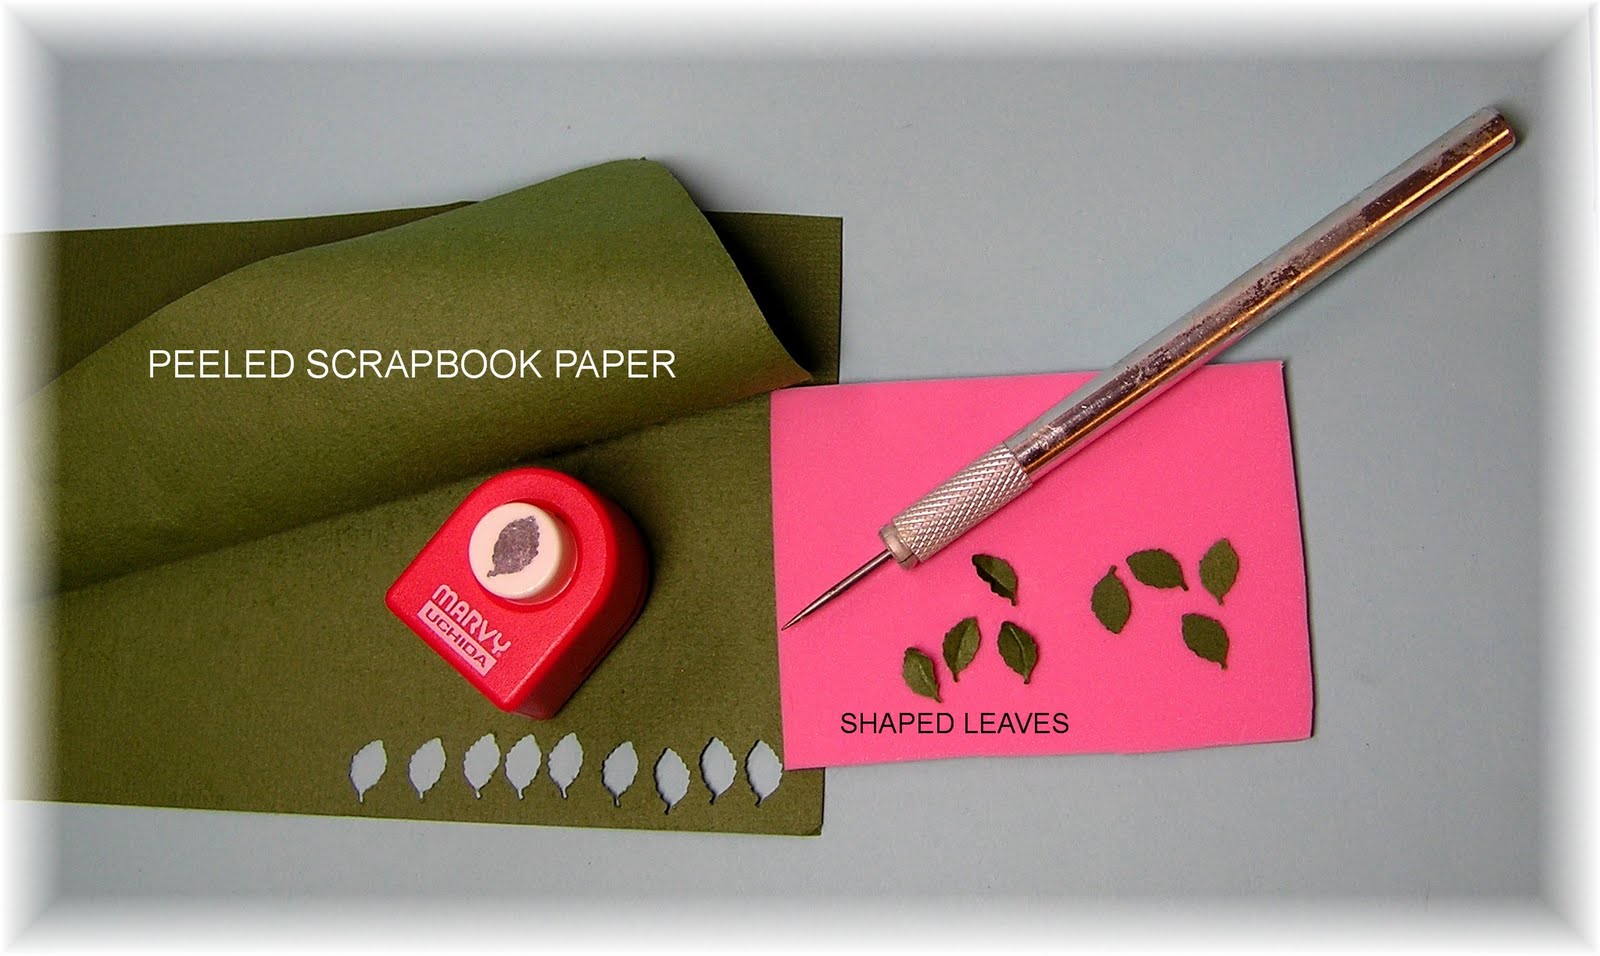
Punch leaves from solid core green paper. Hint: Thicker scrapbook paper usually consist of several plies. With a bit of patience one can pull the plies apart giving nice thin paper with a nice texture. Lay the leaves on fun foam or the palm of your hand and run a pointed stylus down their centers, creating a center vein an shaping them. Add several leaves to the stem of each flower by holding a leaf by its top, dipping the other end in glue and pressing on to stem.. Trim the stems to desired lengths.
------------------------
I really like this drying rack because it is quite simple to construct, has lots of possibilities, and can be varied in so many ways. Let you imagination loose to see how you can use it. see you soon!
===============================
Part 7: A PLANT RACK
This rustic piece provides extra storage and display room for the vignette.

PLANT RACK
You will need: 3/32” square stripwood + wood glue + paint and stain in colors of your choice
Click on pattern to enlarge. Copy and paste to computer.
Set to print at actual/exact size or 8.03"W x 7.00"H
--------------
Instructions: Cut: two back legs 5 ½” long (A’s); four back cross pieces 1-13/16” long (B’s); two vertical rack backs 1-13/32” (top C’s) (, two 1-9/16” (middle C’s) and two 1-17/32” (bottom C’s); three back shelf supports 1-13/16” (D’s) Using wood glue assemble the rack back as shown in diagram. Glue the D pieces to and in front of the C pieces for a double thickness that will create a back support for the shelf. Note: You may use the pattern or a ruler as a cutting guide. Double check your measurements before cutting your pieces as you may need to make slight adjustments depending on thickness of glue etc.
For rack sides cut two front legs 4” long (E’s); six cross pieces 1” long (F’s); six braces with 45 degree end cuts as shown (G’s). Assemble and glue the side pieces to the back assembly and to each other.
Cut six cross pieces 1-13/16” long (H’s). Glue one each, three total, spanning the rack at the center of each H piece, for shelf supports. Glue one each, three total, spanning the rack between the E’s, for rack fronts.

You may choose to pre-paint your stripwood before cutting or assembly or do so after assembly and the glue has set.
Cut three shelves from cardstock to fit your shelves; paint or stain to match the rack or in wood tones. Glue in place to top of shelf supports.

Fill the rack shelves as desired with potted plants/herbs, garden knick-knacks, etc.

Hopefully it will not take me as long to get back here with the last few projects for this vignette as it did this time. Summer always means more interruptions in my miniature work...usually pleasant ones, like overnight visits from family and friends. But I like to work in long sessions at a time, usually until the sun comes up and that schedule does not work well while trying to entertain.
By the way, we actually had a real summer day on the first official day of summer, but alas, it is raining again. I feel for the strawberry and other seasonal farmers here because there have not been enough warm days to make for plentiful crops. But everything in nature is wonderfully green...including the weeds, looks perfect but oh, the allergies, sniff, sniff, sneeze, sneeze. But I won't complain because life is good & crabbing season opens next week!
Joann


=====================================
Part 8: Seed Storage Box; Seed Packets
SEED STORAGE BOX
A versatile, easy to create, handled box. Here it is used to hold seed packets but you are sure to find many creative uses for this box.

Instructions: Using patterns cut one bottom, two sides, and two ends from matboard. Glue the face of the end pieces to the short edges of the bottom piece, bottom edges flush. Glue the face of the side pieces to the edges of the bottom pieces and end pieces, bottom edges flush and all corners squared up.
Cut 3 dividers from poster board and glue into bottom of box, spaced evenly apart.
Using colored printies & glue stick cover outside of matboard box. When the glue has set the box may be weathered/aged by lightly sanding here and there and /or using a light mixture of Dark Burnt Umber acrylic paint and Delta Gel Stain Medium. The aging/weathering should be done where this would naturally happen, e.g. corners & edges.

Click on image to enlarge. Copy and paste to computer.
Set to print at exact/actual size or 4.59"W x 2.49"H
Print onto bright white paper.
------------
For the handle I used a thin strip of bamboo from a bamboo mat. It is approx. 1/32” thick and a scant 1/16” wide. I soaked it in hot water until it bent with ease and then cut it to a 3-3/8” length. You may choose to do the same or use the same measurements and cut the handle from poster board. Glue the pre-shaped handle to the ends of the box, securing with a dab of cyanoacrylate glue (Crazy, Super, etc.)
---------------------------------
SEED PACKETS

Cut out printies. Fold and glue the fronts over the tabs. Hint: because of the small size of these printies you may find it easier to score and fold on line before cutting them out.
Arrange packets in storage box.

Click on image to enlarge. Copy and paste to computer.
Set to print at exact/actual size or 7.11"W x 3.76"H
Print onto bright white paper at best settings.
============================================
Part 9: Garden Stakes and Pansies in Planter Box & Side Shelf of Potting Bench
GARDEN STAKES

Make printies of stake labels onto bright white paper. Cut them out in strips with a scant border on the top and bottom edges. Glue the strips to ¼” x 1/16” stripwood which has eiher been painted white or left natural. When glue has set use a razor saw (Xacto X75300 Precision Razor Saw Set ) to separate each label with a slight border on each end. Sand all edges, going slightly onto the paper to smooth out the edges for a painted rather than a papered look. Working with 1/16”thick x 1/8”wide stripwood either left plain or painted white, cut into 1-1/2” lengths for stakes. If painted, lightly sand to expose some wood. One end may be sanded to a point if desired. Glue the stakes to the back of the prepared labels, centered side to side with top edges flush.

Click on image to enlarge. Copy and paste to computer.
Set to print at actual/exact size or 4.26"W x 1.88"H
Print onto bright white paper at best settings.
------------------------
PANSY BOX

Click on image to enlarge. Copy and paste to computer.
Set to print at exact/actual size or 3.68"W x 3.72"H
Print onto bright white paper at best settings.
---------------
Cut the box pieces from 1/16” thick stripwood or matboard. Glue the face of the end pieces to the edges of the bottom piece, bottom edges flush. Glue the side pieces to the ends and bottom pieces, all edges flush. Make copies of pansy label on bright white paper, cut out and using glue stick, adhere one label to each side. Use a very light black wash to weather the box and label. Cut a piece of Styrofoam to fit inside of box but slightly shallower. Hint: If you have scraps of foamcore board use this as the fill by first peeling off the top layer of paper. This foam is finer than regular Styrofoam and works well for projects like this. Paint the top of the filler a dirt brown. Fill with pansies.

PANSIES
Pansies may be white, blue, mahogany, red, rose, yellow, apricot, purple, or striped or blotched bicolored. I suggest you look online at the many color varieties.

Blossoms:
Cut lengths of #22 green cloth covered floral wire (Sunrise Floral Wires - 22 gauge - Green ). Dip the tip of one end of each wire into deep yellow acrylic paint for the pansy center; poke into a scrap of Styrofoam to dry (see hint above regarding foam core).
Using Fiskar’s Heart Corner Punch (Fiskars 12-23257097 3-in-1 Corner/Border Punch, Hearts ) and desired color of lightweight paper, punch out the multi-sized hearts…each pansy will use one large and two medium hearts as shown in photo. Using a 1/8” round paper punch (Fiskars 12-23518897 Hand Punch, 1/8-Inch, Circle
 ), punch out two rounds of same color.
Holding petals flat with a needle tool or pointed stylus, use watercolors and a tiny pointed paintbrush to feather-on color to the pointed sides of the three hearts (not the rounds). Use violet on yellow, white and lavender or mahogany on pink and orange…again look online for possible color combinations & color placement.
Place prepared petals & rounds on a piece of thin white Fun Foam. Using a small to medium ball stylus, trace around the shapes causing them to slightly cup-up & crinkle.
Pick up the large heart by the fat end with pointed tweezers, dip pointed end into Crafter’s Pick glue, picking up a dab. Place on a prepared flower stem, just under the yellow center at a right angle to stem. Doing the same with the two smaller hearts, place them to each side of, and tucked just slightly under the larger heart. Repeat for the two rounds, overlapping them slightly to fit in the space above the hearts. Poke into Styrofoam to set.
Using an approx. 5/16” flower punch, as seen, or a similar one, punch out a dark green paper calyx. Use a needle tool to poke a hole in its middle and insert it with a tiny dab of glue onto the pansy stem, pushing it up flush with the back of the flower. When the glue has set, slightly “rumple” the ”petals” and using tweezers, pull them down and away from the flower. Using needle nose pliers bend the flower back to about a 90 degree angle to the stem.
-------------------------------
Buds:

Use the large heart from the varied heart side of the Fiskars Hearts punch. Lay two of them on a scrap of thin white Fun Foam and roll over them from side to side with the edge of a pointed stylus, causing them to curl up. Add glue to the inside and roll up fairly tightly on the end of a length of #22 green cloth covered wire, pinching the pointed end tightly to the stem. You may use one or two hearts in one or two colors for the buds.
Follow the blossom directions above for creating and adding a calyx to add one to the bud. Use needle nose pliers to bend the bud back from the stem to an acute angle to the stem.
-----------------------------
Leaves:
Using either of the two designs shown on the Fiskars Leaves Corner punch ( Fiskars 12-23307097 3-in-1 Corner/Border Punch, Leaves
========================
So there you have it, the completed Potting Bench vignette filled with all of the above projects and items from my collections. I hope you have enjoyed the project and if so please take a minute to let me know. And if you create the vignette I would love to see your version...if you take photos please share.
On to the next DIY project. I am trying to decide between two summer themes so check back to see which I decide on.
Hoping your summer is all you desire....
Joann
------------------------------------