


I had wanted to get this project
out to you as an apropos New Year’s Eve themed project but the holidays were just
so filled that miniatures had to take a back seat. So rather than waiting yet another year to
show you these darling bottles, here they are
The only difficult part of
this project for you will probably be locating the exact lights but some stores
still offer after holiday sales (at better prices) and there are also stores,
especially online, that sell Christmas items all year long. I bought both plain white and multi-colored (green,
yellow, red, blue) strings. Have to
confess here, after seeing how well the finished items looked, I bought several
of each. I know I will be using the pieces I make from
them for many projects

So, good luck hunting down
the lights, your search will be worth the time involved. And if you can not find these bottle lights
now, there is always next Christmas season…and the way retailers seem to work,
that is probably not that far off.
Joann
PS
Many of you have seen and tried my many projects
that involve turning Lite-Brite pegs and acrylic rods into bottles and
glassware but for those that have not, and just in case you are unable to find
the bottle lights used here until the next holiday season, I will be including
the bottle DIY for both Lite Brite Pegs and acrylic rods.
+++ The Lite Brite Peg/acrylic rod instructions are now included at the end of this post ++++
====================
GENERAL INSTRUCTIONS
The
first thing to do is remove the bottles from the lights….a quick tug should
work.

A
fine-tooth razor saw and a matching
miter box are used to cut the bottles to size.
The
bottles have a textured surface, which is an interesting look, but for some
pieces you may want a smoother surface.
To obtain this, simply file/sand the bottle’s sides (emery boards work well here) until the
desired finish is accomplished. Don’t
worry about clouding up the finish as a coat of clear nail polish will fix this.
(If you have a Dremel tool and buffing attachments they will also
return the finish to a gloss). Leaving
the sanded sides as is will give your bottles a frosted-glass look.
A sharp, pointed blade X-acto knife is used to ream out the insides of the pieces as needed.
Assorted sizes of round paper punches are used
to punch rounds from sheet acrylic (look to scraps of blister pack or
other heavy plastic packaging ) to create bottoms for glasses.
E-600 glue is used to adhere
parts together.
Sharpie
Permanent Marker Pens and/or nail polish (white, black and metallic’s) were
used to color tops of bottles and to tint acrylic sheeting for glass bottoms as
needed.
=====================
SPECIFIC INSTRUCTIONS

BOTTLES: For large bottles, use a fine-toothed saw to remove the lower, smooth section of the bottle. For shorter bottles, saw to desired height. File/sand the bottoms smooth. If the almost invisible side seams bother you, scrape them away with an X-acto knife. If you want a smoother-sided bottle, file/sand the sides all around. Leave as is for a frosted look or coat with clear nail enamel or buff to a sheen.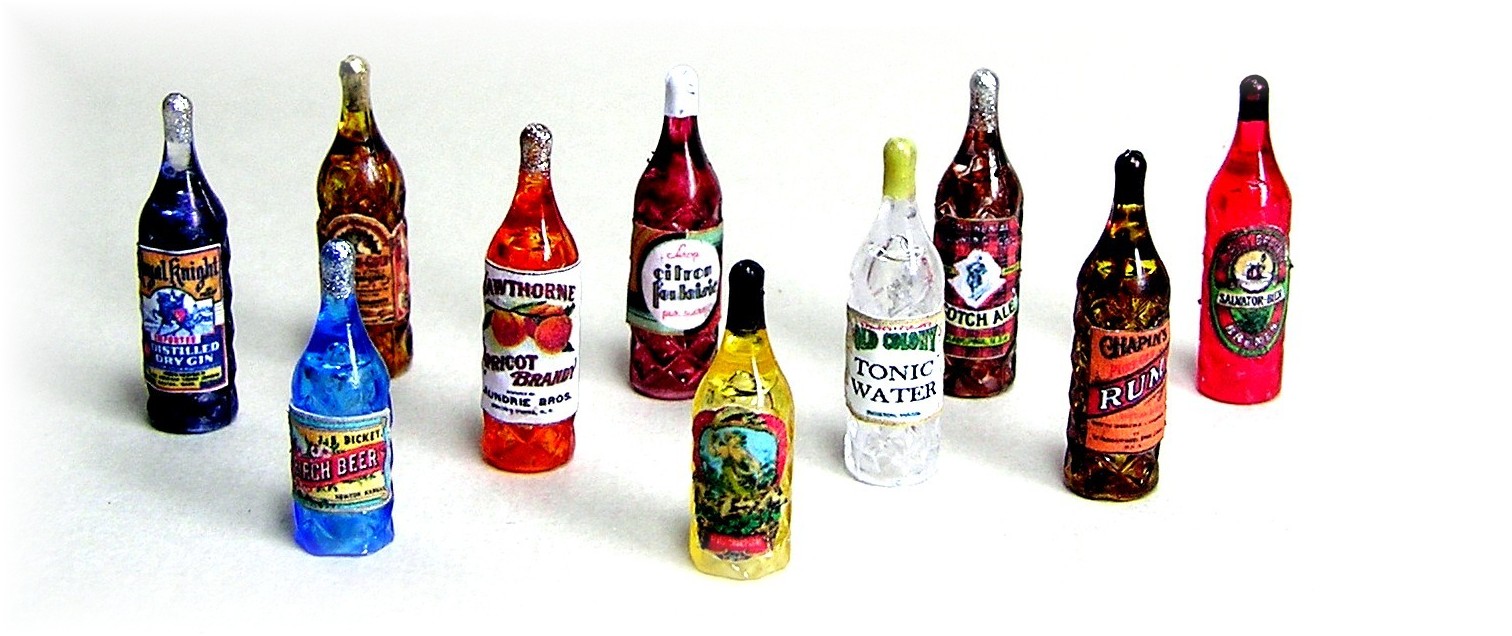
For large
BOTT

The actual label is smaller than this image.
Carefully
cut out a label printie and adhere
to bottle, placed as desired, with a light coating of a tacky-type glue that is compatible with plastic. You may want to get creative and design your
own personalized labels…these make fun gifts for friends in miniature. Note:
For a Christmas gift I designed a personalized label for a non-miniature friend
and glued them to two bottles. I drilled
holes in the tops of the two bottles, inserted pronged jump rings into the holes
with E-600 and then attached hook earwires.
She loved her “designer” earrings!
When time allows I am going to create a charm bracelet.

SMALL TUMBLERS:
These are made from the bottom sections of the bottles that
were removed. Use an X-acto knife edge to ream out the inside of the glass-to be
until desired thickness is achieved….the thinner the walls the better. Note: You
will find it much easier to prepare them before they are removed from the
bottles because you will have more to hold on to and not have to worry about
the blade extending out the bottom of the piece. Sand or scrap the cut edges smooth.

===========

MEDIUM-SIZE
GLASSES: As
seen, these are cut to include the smooth
bottom section of the bottles and approx. 1/8” of the decorative section. The inside walls are reamed out as, the tops
and bottom prepared as described above, for the small tumblers.

==========================

TALL
GLASSES: Cut
the bottom section of the bottle off
just at the seam between the two sections…this will leave you with a slightly
rounded and closed bottom. Cut it from
the bottle at a 3/8” height. Sand the
bottom smooth and check to see if the glass sits straight, making any
adjustments needed by filing. Ream out
the inside walls as described for tumblers.
Use clear nail enamel to
gloss the insides.

========================

STEMMED GLASSES:
Cut a ½” long section of the
bottles, measuring down from the top of the tip. Ream out insides as described above. Sand the top edges smooth and the rounded tip
flat. For bottom of stems, punch out a
3/16” round from clear or colored to match, sheet acrylic. Using E-600, glue the bottoms centered,
evenly to the tips, making sure the glasses are sitting straight. You may find it easier to center the bottoms
if you mark the center with a tiny dot.
Treat with clear acrylic as desired or leave as is for a frosted-glass
look.

========================
.Shortly, hereafter, I will be adding the
instructions, etc. for using Lite Brite Pegs and acrylic rods to create
bottles….stay tuned.
+++ As Promised +++
+++++++++++++++++++++++++++++++++++++++++++


THE FOLLOWING ARE SLIGHTLY EDITED EXCERPTS
FROM SOME OF MY DIY ARTICLES FROM OVER THE YEARS THAT INCLUDE CREATING BOTTLE,
JARS, GLASSES, ETC.
Note:
Some of the photos are scanned from older photos so are not the best
quality but they should get the “message” across.


From Strawberry Fields Forever, June
2004
SYRUP BOTTLE
Insert the large end of a
red Lite-Brite peg into a variable-speed electric drill. Hold the drill so the peg sits upside down on
a flat surface; set the drill on a slow speed, in your other hand , hold a
Dremel MultiPro rotary tool fitted with a drum sander to shape the peg as shown. Keep the revolutions of the tools slow so
that heat does not build up and soften the peg.
When the desired shape has been achieved, smooth the peg with
fine-grained sandpaper (or buff attachment on Dremel) as it rotates on the
drill. Release the peg from the
drill. Place the piece in a miter box
and with a fine-toothed razor saw cut the top and bottom off to achieve size
shown. If you are planning on turning
numerous bottles, strap the drill down to a flat surface.


SET TO PRINT BOTTLE TEMPLATE AT 0.66"W X 1.26"H
Use clear nail enamel to
touch up any dull places on the bottle caused by the tools. Punch a 1/8” round lid from white
illustration board. Glue lid to the to
of the bottle and a label to the side.
==========
From Canning Time, September 2003
JAM and JELLY JARS
Cut Lite-Brite Pegs (look
for the game replacement pegs at toy/game or 2nd hand shops)in the
desired color to desired height with a fine toothed razor saw. Use red for raspberry, dark pink for
strawberry, and purple for grape. Cut or
sand the pegs rounded bottoms smooth and flat.
For jar lids, punch out rounds of gold, silver or glossy white
cardstock. Sandwich two rounds together
with glue and adhere to jar top. Add
labels as desired.

==================
From The Coffee Pot Espresso Stand,
2007

CREATING BOTTLE FROM ACRYLIC RODS
The bottle are formed from
sections of ¼” diameter plastic rods purchased from Tap Plastics ( www.tapplastics.com or 1-800-246-5055
for mail order. Store fronts in WA, Or,
CA in USA

SET TO PRINT AT 1.29"W X 1.67"H
-------
Using the bottle pattern, or
your own, as a guide, cut sections of the rod to length with a razor saw. Insert the cut pieces into a variable speed
drill. With the drill turned on to about
a medium speed use various tools, like a Dremel Moto tool with assorted
attachments, and or hand carving tools, craft knives, assorted files, and
medium grade sand paper to shape the rod to shape desired. As you experiment with shaping the pieces you
will probably find tools that work best to do the job for you.
For some reason or other I
like to hold my drill in my lap as I shape the piece but you may feel more
comfortable with it on a table top fitted with a non-skid surface such as a
mouse pad or you could hold it in place with tape. Note: If you plan on doing many of the bottles or
for long tern use you can come up with a strap gizmo to hold the drill in
place.

Your first shapes may be a
bit wonky but it doesn’t take long to get the procedure down and a rhythm
set. You may also notice that different
colors of the rods cut differently. When
the shape pleases you and all is smooth, remove the bottle from the drill. Use sandpaper to very slightly round-off the
bottom edge. Make sure the piece stands
straight and make any needed corrections with sandpaper. Amy dullness of the acrylic may be buffed out
using a buffing attachment on a Dremel tool or may simple be coated with clear
nail enamel.


---------------------
From Harvesttime, A Fresh Produce
Stand.
Septemeber 2000


BOTTLES OF HONEY
The bottles of honey are
carved from amber-colored Lite Brite pegs (from the Halsbro Children’s toy;
loose packages of these multicolored plastic pegs are often found at thrift
stores and refill packs are available at toy stores). Place the peg in a drill and with the drill
turning at a low speed, use various tools to shape the area between the two
sections so it is smoothly tapered. Remove the peg and sand the large end of
the peg until it is flat….this will be the bottom of the jar. Place the peg in a miter box and using a
razor saw, cut off the top of the peg so the remainder is approx. 5/8”
high. If the “jar is dull, paint with
clear nail enamel. Add a 3/16 round,
punched from glossy cardboard for the lid.
--------------
FROM: WET BAR IN A WINE RACK
JANUARY 2002


SET TO PRINT AT 1.99"W X 1.28"H
-----------------
Also check out other blog
posts herein for other ideas: Bottle of
Molasses in SUGAR & SPICE Part 2, Dec. 2010; Cleaning supply in May 2011
Creative Minds are Seldom Tidy: Glasses
of juice in Your Invited to a Valentine Party, Feb. 2011.
---------------
Even if you can't find the Christmas Tree Lights right now, this should keep you busy making bottles & jars with materials you can find or may have on hand. Have fun and let us know how this works for you.
Joann
======================